Canvas Spreadsheet Integration
Documentation
What is CSI?
CSI (Canvas Spreadsheet Integration) is a custom script designed for seamlessly retrieving Canvas data automatically. Initially developed to create an organized checklist for assignments and facilitate comprehensive tracking of due dates, CSI has evolved into a robust tool.
The script automates the retrieval and update of course-related information from the Canvas API, seamlessly integrating it into a Google Spreadsheet. It efficiently categorizes data into distinct sheets for each course, implements conditional formatting, and improves visual comprehension through alternating row colors. Primarily tailored for individuals enrolled in Canvas courses, CSI offers an efficient solution for managing and monitoring assignments, ensuring a hassle-free approach to staying on top of due dates and course-related details.
This project is available on Github, for free, for everyone. This work © 2024 by Veillax is licensed under CC BY-NC-SA 4.0. To view a copy of this license, visit http://creativecommons.org/licenses/by-nc-sa/4.0/
You can view the code here: https://script.google.com/home/projects/1pmcO3Y9mfHMS7cXRm9w8ePhAy7sbKyXbEhUf3HVJpYpYvCE38EQ0V80K
How does CSI work?
CSI utilizes Canvas’s API to retrieve course and assignment data through an Access Token, a distinctive key associated with your personal account. Subsequently, leveraging Google Apps Scripts, it systematically transfers the acquired data to a spreadsheet, facilitating a streamlined presentation of due assignments specific to each course.
How do I use CSI?
To get started with CSI, navigate to Google Sheets and create a new Blank Spreadsheet. Next, click on
Extensions > Apps Script

After it loads, locate
Libraries, then click on the plus
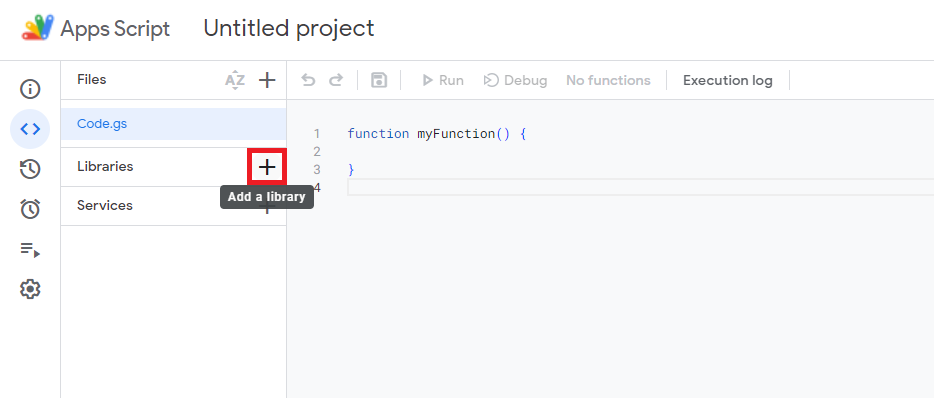
Copy the following into the
Script ID slot:
1pmcO3Y9mfHMS7cXRm9w8ePhAy7sbKyXbEhUf3HVJpYpYvCE38EQ0V80KThen click
Look Up
Once the App Script has found the library, then click
Add to add the library.
Next, hit
CTRL/⌘ + A, then Delete to remove the previous code. After that, copy this code
into the empty file:
  function refresh() {
    var accessToken = "your_canvas_token";
    var namespace = "your_canvas_namespace";
    var spreadsheet = SpreadsheetApp.getActiveSpreadsheet();
    CSI.run(accessToken, spreadsheet, namespace);
    }
Make sure to replace
"your_canvas_token" and "your_canvas_namespace" with your canvas
access token and namespace
After that, the code should look something like this:
(the values for accessToken and namespace are examples and should not be used, as
they are not legitimate values)
 var accessToken = "2108~un4dJHswdqOfGvlZMZihCGStTeSXmh4UwjKVBKSDa3UvcsnSw2pK85i3pqyV55s"
  var namespace = "school"
  var spreadsheet = SpreadsheetApp.getActiveSpreadsheet()
  CSI.run(accessToken, spreadsheet, namespace)
This code assumes your canvas url is
namespace.instructure.com. If your school uses a different url, such as online.smc.eduIf you aren’t sure what to do here, view How to get an Access Token and How to find your Canvas Namespace below. Finally Finally, click save (either the little floppy disk icon in the toolbar or
CTRL/⌘ + S), then click
RunIf you get a page asking for permissions, click
Review Permissions, then click Advanced, then Proceed to Untitled Project(unsafe). Finally, click Allow The tool should now automatically get the assignments, pages, quizzes and other associated data from Canvas and put it all into the spreadsheet for you.

If you want it to be more accurate, you can turn on Time-Driven Updates.
How to enable Time-Driven Updates
Triggers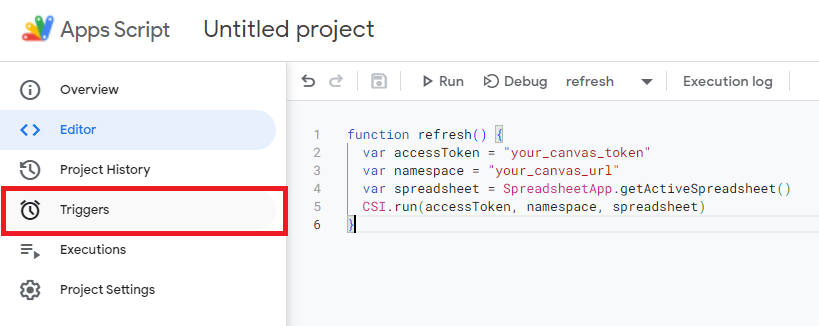
Now, in the bottom right corner, click on
Add Trigger
Set the event source to Time Driven, and leave the type and interval set to default values, then click
Save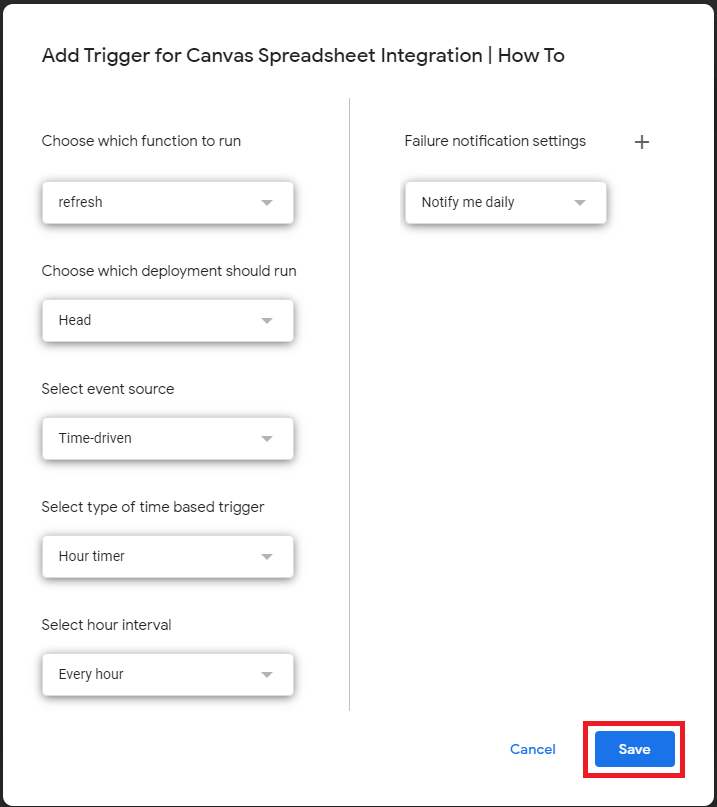
How to get an Access Token
All registered students, faculty, TAs, and staff are able to access the Canvas API simply by virtue of having a Canvas account. The types of data you’re able to access through the API depend on your role in Canvas. As a student, you have the same permissions when accessing Canvas through the API as you do when using the Canvas website — that means you can access things like your class schedule, due dates, and discussion posts, as well as your own grades and assignment submissions.
Generate your Canvas access token
Accessing the Canvas API requires a token, which you can think of as your username and password squished into one long random string. Anything you can do in Canvas can be done by someone else if they have your token, so don’t share your token with anyone else (or ask others to share their token with you)!
Follow these steps to generate your personal access token.
1. Log into Canvas. Click
Account in the left menu, and then click Settings.
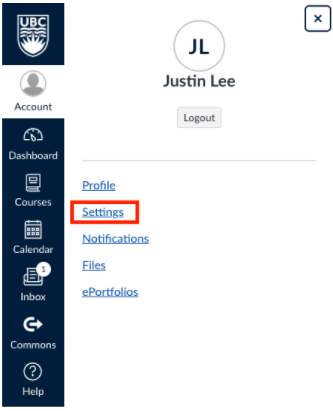
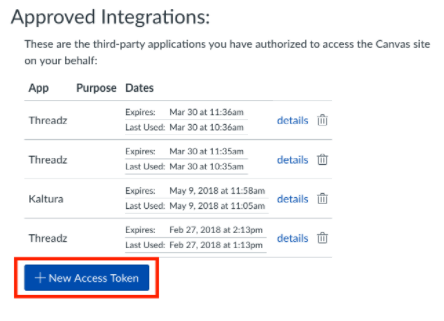
2. Scroll to
Approved Integration and click New Access Token.
3. Fill in the
Purpose field.
4. Click
Generate Token. Now copy your freshly generated token and save it somewhere secure.
One last reminder to never share your token with anyone. If you think your token may have been exposed (for example, by accidentally posting it to GitHub), delete your token from Canvas right away. Instructions for creating and deleting access tokens as a student are available on the Canvas Guides.
How to find your Canvas Namespace
In Canvas, a namespace is like the unique identifier or label for your institution or school within the Canvas system. It is the initial part of the web address that specifies where your Canvas account is hosted.
For example, in the URL
https://schoolname.instructure.com/courses/123456/modules,
schoolname is the Canvas namespace. It distinguishes your Canvas instance from others, allowing tools
like CSI to precisely connect to and retrieve data from your specific Canvas account.
Think of the Canvas namespace as the digital address that ensures any data requests or interactions are directed to the correct school or institution within the broader Canvas platform. Understanding and correctly using your Canvas namespace is crucial for accurate and secure integration with external tools and scripts like CSI.
How to Find Your Canvas Namespace
1. Log into Canvas: Visit the Canvas website and log in with your username and password.
2. Select a Course: Click on one of your courses to enter the course page.
3. Check the Web Address: Look at the web address in your browser's address bar.
4. Identify the Start of the Address: Find the part right at the beginning of the address, before
.instructure.com.5. Write Down the Namespace: Take note of the letters or words you see at the beginning of the address. This is your Canvas namespace.